Backyard Compost Methods
If you’ve been following me at all, you’ll know how much I absolutely LOVE compost. It’s nature’s balanced fertilizer, basically free, and keeps organic material out of the landfill reducing household waste. It’s a win-win-win.
In part one we talked about what goes into your home compost pile. If you haven’t read that yet, be sure to read it now.
But what methods are available at home? Let’s break it down.
Cold Composting
Cold composting also called slow composting or passive composting is my preferred method of composting because, well, lazy gardener right here.
Passive composting allows all the super awesome beneficial insects, fungi, and microbes to infiltrate your compost mix. Over time they break down the material to be beautiful rich compost. And it’s super simple to do .
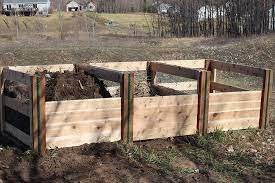
Decide if you want the pile to be contained or not. If you want it contained, you can build towers out of chicken wire or other materials. You can also purchase bins. I like using the geobin, but other bins with lids are available. You can also use fancy tumblers or simple tumblers if you are already experiencing pest issues, but the process is more hands on with the constant turning.
In passive composting we layer the materials with or without mixing. I like to start with browns to create a small barrier on the ground. Then as I accumulate green material, I add greens then cover with browns.
Continue to add greens and browns until your pile or container is full. You’ll want to keep that magic 2:1 ratio and make sure to cover any green material with a thick layer of brown material to keep pests out.
Wait. I mean seriously wait. It takes about a year for the compost to be useable. It will be more chunky than it’s hot composting cousin, but because it isn’t hot you can use the compost right away in the garden.
The main drawbacks of passive composting is that it does not kill pathogens, so don’t put diseased plant material in the compost. Passive piles will not sterilize seeds either, so expect a few volunteer plants. Turning the pile every once in a while will speed up the process but the pile won’t get hot enough to kill pathogens or seeds.
Hot Composting
This is the fastest way to make compost at home and it has many benefits. You get A LOT of compost at one time, most seeds will be sterilized, and most plant borne pathogens will be killed. But, it requires a lot of hands on work, a big(ish) space, and you need a lot of material to get started.
You’ll need a space that is big enough for a pile that is 1 yard³ (3’x'3’x3’). You can use a 3 part pallet system or just create an open pile in your yard.
Collect enough material to fill that space all at one. You’ll need about 2 parts browns - carbon rich material (leaves, branches, cardboard, paper, woodchips) and 1 part greens - nitrogen rich material (food scraps, grass clippings, manure). Mix all the material together until it is well combined.
Over the course of the next 4-6 weeks the pile should stay between 120°-150° to kill pathogens, bacteria, and seeds. Once you notice your pile’s temperature is dropping closer to 120° you’ll need to turn your pile.
Once the pile shrinks down to half of its original size, the compost will need to cure. Let the compost sit for a few months if you plan to use large quantities or directly on roots of plants. If you are mixing it into your soil, you can use it in 2-3 weeks. Compost is completely finished when it is dark, crumbly, and uniform in texture.
*If you’re having a hard time collecting enough material at once, you can collect using the cold composting method mentioned above.
No matter which method you decide to use, find a place in your yard that gets decent sun that you can access regularly.
Make sure to sign up for our mailing list to get notified when we post part 3 of this series on composting with worms.
Need help setting up your compost? CONTACT US to find out more.


